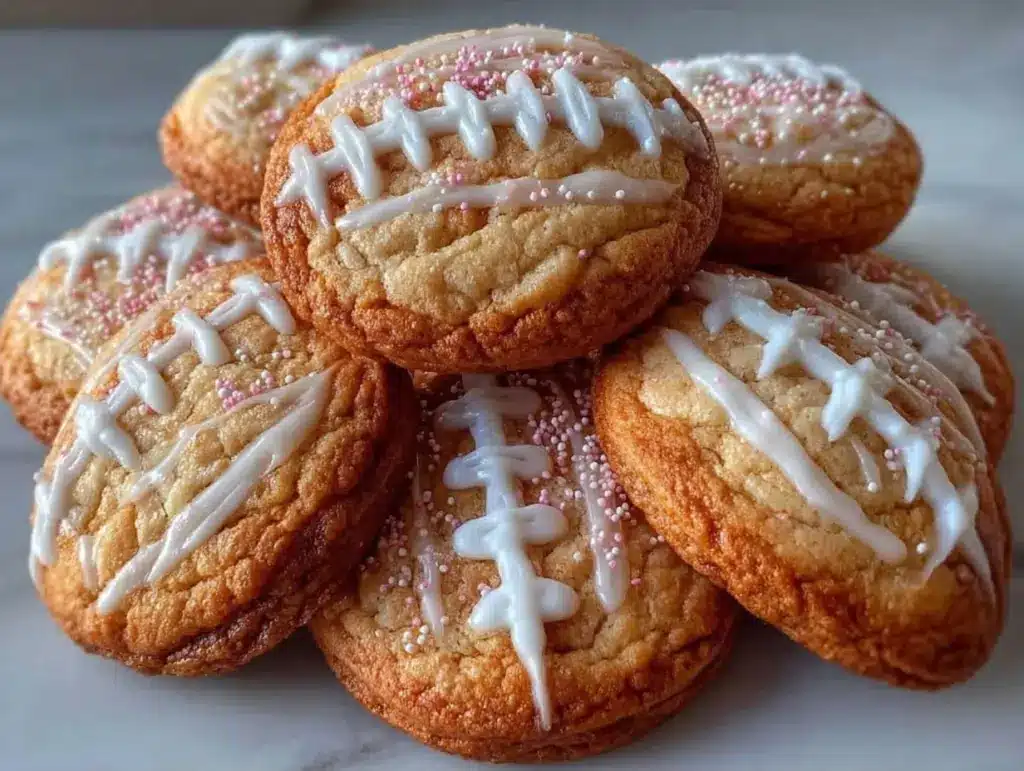
It was 2014, the Super Bowl was on, and I was standing in my kitchen with a tray of sugar cookies that looked like absolute disasters. They were cracked, uneven, and frankly, they didn’t look like anything football-related. I had spent two hours icing them, trying to make little helmets and balls, but they just looked like sad, white blobs. My husband walked in, took one look, and said, “Are these for the game or for a funeral?” I was ready to throw the whole batch in the trash.
But I didn’t. I ate one anyway. And it was delicious. Chewy, buttery, perfectly sweet. That’s when I realized that presentation matters, but flavor matters more. Especially when you’re cooking outdoors. That night, I started experimenting with a new method. I wanted cookies that could handle being out on the patio, cookies that wouldn’t melt in the summer heat (or freeze in the winter cold), and cookies that tasted like they came from a professional bakery, not a box mix.
Fast forward to today, and I’ve made these Football Sugar Cookies for Game Day Parties at least fifty times. I’ve smoked the dough (yes, really), I’ve grilled the icing, and I’ve figured out the exact ratio of butter to flour that gives them that restaurant-quality chew. These aren’t just cookies; they’re the star of the dessert table. And unlike my loaded chili cheese nachos which disappear in the first ten minutes, these hold their shape and their flavor all game long.
If you’ve ever struggled with cookies that spread too much or taste dry, this is the recipe that will save your reputation. It’s hands-on, it’s a little messy, but the result is worth every minute. Let’s get the grill fired up.
Why You’ll Love These Game Day Cookies
There are a thousand cookie recipes out there. So why make these? Because they solve the biggest problem with baking for crowds: consistency and flavor depth.
Smoky Depth — I know, hear me out. Adding a touch of liquid smoke or smoking the dough before baking gives these cookies a complex flavor that regular sugar cookies just don’t have. It’s subtle, but it makes them taste like they were made over an open flame. It pairs perfectly with the sweet vanilla icing.
Perfect for Icing — These cookies are sturdy. They don’t crumble when you spread thick royal icing on them. They don’t crack when you pipe intricate designs. I’ve used them for everything from simple team logos to detailed football helmets. If you want to show off your decorating skills, this is the canvas you need. It’s similar to the structure I look for in my frosted red velvet cupcakes, where the base needs to support a heavy topping.
Make-Ahead Friendly — Game day means you’re busy watching the game, not staring at an oven. These cookies taste even better the next day, after the flavors have melded. You can bake them, ice them, and store them days in advance. I usually make them on Friday, ice them Saturday, and they’re ready for Sunday kickoff.
Outdoor Cooking Ready — You can smoke these directly on the grill. Yes, you read that right. We’ll talk about how to do that in the instructions. It’s a game-changer for flavor and it gets you outside while the game is on. It’s way more fun than standing over a hot stove.
Customizable — Love your team’s colors? Make them green and yellow. Hate football? Make them black and white with gold accents. These cookies are a blank slate for your creativity. And if you’re serving a crowd, they’re easy to cut into squares or circles for easy handling.
Real talk: these have become my go-to for every party. From Super Bowl Sunday to backyard barbecues, they’re always the first dessert gone. And unlike my creamy strawberry cheesecake milkshake which requires a blender and a glass, these are finger food. No mess, no fuss, just pure cookie joy.
Ingredients You’ll Need
Here’s the best part: you probably have most of this already. I’m particular about three ingredients here, and I’ll tell you exactly why. For the base, we’re going with a classic buttery sugar cookie dough, but with a twist for texture and flavor.
Unsalted Butter (1 cup / 226g, softened) — This is non-negotiable. Use real butter, not margarine. Margarine has too much water and makes the cookies spread too much. I buy the good stuff, the European-style butter if I can find it. It adds a richer flavor that makes a huge difference. Let it soften to room temperature before you start.
Granulated Sugar (1 ½ cups / 300g) — Standard white sugar. Don’t try to substitute with brown sugar here; we want that crisp edge and chewy center. The white sugar helps create that signature sugar cookie texture. I use regular granulated, nothing fancy.
Egg Yolks (2 large) — I use only yolks, not whole eggs. This gives the cookies a richer, more tender crumb. Whole eggs add too much moisture and can make the cookies cakey. Just separate them. It’s a pain, but worth it. If you’re worried about waste, save the whites for my chewy coconut macaroons recipe later.
Vanilla Extract (2 teaspoons) — Use real vanilla, not imitation. I know it’s more expensive, but in a simple cookie like this, the vanilla is the star. It should smell amazing when you open the bottle. If it doesn’t smell like vanilla, it’s not good enough.
All-Purpose Flour (3 cups / 375g) — This is the structure. Don’t use cake flour or bread flour. All-purpose is just right. Sift it if you can, but spooning it into the measuring cup and leveling it off works too. Don’t pack it down, or you’ll end up with dry cookies.
Baking Powder (1 teaspoon) — Fresh baking powder is crucial. If it’s been in your cabinet for years, toss it. Test it by dropping a teaspoon into hot water—it should fizz like crazy. Old baking powder means flat, dense cookies.
Salt (1 teaspoon) — To balance the sweetness. Don’t skip it. It makes the vanilla taste more vanilla.
Liquid Smoke (½ teaspoon) — This is the secret weapon. Use hickory or applewood for a subtle smoky flavor. Don’t overdo it; you want a hint, not a BBQ rib taste. I usually start with ¼ teaspoon and adjust.
For the Icing:
Confectioners’ Sugar (4 cups / 480g) — Sifted. Always sifted. Lumps in royal icing are the worst. I sift mine twice to be safe.
Meringue Powder (3 tablespoons) — This stabilizes the icing and makes it safe to eat raw. I don’t trust raw egg whites, so meringue powder is my go-to. It also helps the icing dry hard, which is perfect for decorating.
Water (6-8 tablespoons) — To get the right consistency. Start with less, add more as needed.
Food Coloring — Gel colors work best. They’re more vibrant and don’t thin out the icing like liquid colors do. I keep a basic set of red, blue, white, black, and yellow for game day.
Equipment Needed
You don’t need fancy equipment for this. Here’s what I actually use.
Stand Mixer or Hand Mixer — Mixing the dough by hand is possible but tiring. A stand mixer with the paddle attachment is ideal. It creams the butter and sugar perfectly. I use my KitchenAid, but any mixer works.
Baking Sheets — Heavy-gauge aluminum sheets are best. They distribute heat evenly. I have two large ones. If you’re using a grill, you’ll need a grill-safe pan or a sheet pan that fits your grate.
Parchment Paper — Line your baking sheets. It prevents sticking and makes cleanup easier. I never bake without it.
Cookie Cutters — Football shapes, helmets, or even simple circles. I have a set of metal cutters that stay sharp. Plastic ones can bend and give uneven edges.
Piping Bags — For the icing. I use disposable bags for easy cleanup. Number 1 and 2 tips are good for details, and a larger tip for flooding.
Grill or Smoker — If you’re doing the smoking method, you need a grill or smoker. I use my pellet grill for this, but a charcoal grill works too. Just set it up for indirect heat.
Offset Spatula — For spreading icing. The offset design lets you get close to the cookie without getting your fingers messy. I have a cheap one from the dollar store that works perfectly.
How to Make It: Step-by-Step

Alright, let’s make this! I’m walking you through exactly how I do it, including the little tricks I’ve picked up.
Step 1: Cream the Butter and Sugar (5 minutes)
In your stand mixer, beat the softened butter and granulated sugar together on medium-high speed. Do this for about 3-4 minutes until it’s light and fluffy. This step incorporates air, which helps the cookies rise. Scrape down the sides of the bowl with a spatula to make sure everything is mixed evenly. You want it to look pale and creamy.
Step 2: Add Egg Yolks and Vanilla (2 minutes)
Reduce the speed to medium. Add the egg yolks one at a time, mixing just until combined after each addition. Then add the vanilla extract and the liquid smoke. Mix for another minute. The mixture should smell incredible. If it looks a bit curdled, don’t worry; it’ll come together with the flour.
Step 3: Mix in the Dry Ingredients (3 minutes)
In a separate bowl, whisk together the flour, baking powder, and salt. With the mixer on low, gradually add the dry ingredients to the wet mixture. Mix until just combined. Do not overmix, or the cookies will be tough. Stop as soon as you no longer see streaks of flour. The dough will be stiff and slightly sticky.
Step 4: Chill the Dough (At least 2 hours)
This is the most important step. Divide the dough into two balls and flatten them into discs. Wrap them tightly in plastic wrap. Refrigerate for at least 2 hours, or overnight. Chilling the dough prevents the cookies from spreading too much in the oven. It also makes the dough easier to roll out. If you skip this, your footballs will turn into football-shaped pancakes.
Step 5: Roll and Cut (15 minutes)
Preheat your oven to 350°F (175°C). If you’re smoking the cookies, preheat your grill to 275°F (135°C) for indirect heat. Take one disc of dough out of the fridge. On a lightly floured surface, roll it out to about ¼ inch thick. Use your cookie cutters to cut out shapes. If the dough is too sticky, add a little more flour. Place the cutouts on a parchment-lined baking sheet. Re-roll the scraps and cut more shapes. You’ll get about 24-30 cookies.
Step 6: Bake or Smoke (12-15 minutes)
If baking: Place the sheets in the oven and bake for 12-15 minutes. The edges should be lightly golden, but the centers should still look soft. They will firm up as they cool. If smoking: Place the sheets on the grill grate over indirect heat. Smoke for 12-15 minutes. The smoke flavor will infuse the dough. Watch them closely; smoke can vary in intensity. Remove when they are set but still soft.
Step 7: Cool Completely
Let the cookies cool on the baking sheet for 5 minutes, then transfer them to a wire rack to cool completely. This is crucial. If you try to ice warm cookies, the icing will melt and slide right off. Patience is key here.
Step 8: Make the Icing
In a clean bowl, beat the meringue powder with 6 tablespoons of water on medium speed until frothy, about 2 minutes. Gradually add the sifted confectioners’ sugar, one cup at a time, beating on low. Once all the sugar is added, increase the speed to high and beat for 3-4 minutes until stiff peaks form. The icing should be thick and glossy. If it’s too thick, add more water, one teaspoon at a time. If it’s too thin, add more sugar.
Step 9: Color and Pipe
Divide the icing into small bowls. Add gel food coloring to each bowl and mix until you reach your desired team colors. For white icing, leave it plain. Transfer the icing to piping bags fitted with small tips. Pipe the details onto the cooled cookies. For a football, pipe the laces with black icing. For a helmet, pipe the stripe and logo. Flood the base with a thinner icing if needed.
Step 10: Dry
Let the iced cookies dry for at least 4 hours, or overnight, until the icing is hard to the touch. This gives them that professional look and prevents smudging. Stack them in an airtight container once dry.
Expert Tips & Tricks
Here’s everything I’ve learned from making this dozens of times. These tips will save you from my mistakes.
Don’t Skip the Chill
I’ve made these cookies in a hurry before and skipped the chilling step. The result? A tray of flat, greasy messes. Chill the dough. It’s worth the wait.
Use Gel Coloring
Liquid food coloring adds too much water to the icing, making it runny. Gel coloring is concentrated and gives vibrant colors without changing the consistency. I always keep a tube of red gel on hand for game day.
Thin Icing Correctly
For flooding (filling in the base of the cookie), thin your icing with water, one teaspoon at a time. It should flow off a spoon like honey. If it’s too thick, it won’t settle. If it’s too thin, it will run off the edges.
Smoke Low and Slow
If you’re smoking the cookies, keep the temperature low. High heat will burn the cookies before the smoke flavor infuses. 275°F is the sweet spot. Use wood chips like hickory or cherry for a nice flavor.
Store Properly
Store the cookies in an airtight container with a piece of bread. The bread keeps the cookies soft and chewy. They’ll last up to a week this way. If you’re making them ahead, store the un-iced cookies for up to 3 days, then ice them right before the party.
Common Mistakes (and how to avoid them):
Mistake: Cookies are too hard
Fix: You overbaked them. Take them out when they look slightly underdone. They will continue to cook on the hot pan. Also, check your oven temperature with a thermometer; ovens can run hot.
Mistake: Icing is grainy
Fix: Your sugar wasn’t sifted. Always sift the confectioners’ sugar. Or, you didn’t beat the icing long enough. Beat it for a full 3-4 minutes on high speed.
Mistake: Cookies spread too much
Fix: Your butter was too warm. Make sure it’s softened, not melted. And don’t forget to chill the dough.
Variations & Substitutions
Once you’ve nailed the basic version, here’s how you can mix it up. I’ve tried all of these.
Gingerbread Footballs
Add 1 teaspoon of ginger, ½ teaspoon of cinnamon, and ¼ teaspoon of nutmeg to the dry ingredients. Use molasses instead of vanilla. Perfect for winter games.
Lemon Sugar Cookies
Add the zest of one lemon to the dough and 1 tablespoon of lemon juice to the icing. Bright and tangy, great for spring games.
Chocolate Chip Footballs
Fold 1 cup of chocolate chips into the dough before chilling. The chocolate adds richness and pairs well with the smoky flavor. Use white or dark chocolate depending on your team colors.
Gluten-Free
Use a 1-to-1 gluten-free flour blend. The texture will be slightly different, but still delicious. I’ve used Bob’s Red Mill and it works well.
Dairy-Free
Use dairy-free butter and dairy-free meringue powder (or egg whites if you’re okay with raw eggs). The icing will be slightly less stable, so work quickly.
Vegan
Replace butter with vegan butter and use aquafaba (chickpea water) instead of meringue powder for the icing. It’s a bit trickier, but doable. I haven’t perfected this version yet, but I’m working on it.
Serving & Storage
How to Serve:
I usually serve these on a large platter with a football-shaped cookie cutter on the side for guests to grab. They’re easy to pick up and don’t require plates. I pair them with my frozen coconut lime mojito for a refreshing contrast to the sweet cookies. The citrus cuts through the richness perfectly.
Side Dishes:
These cookies are dessert, so they don’t need sides. But if you’re having a full game day spread, they pair well with savory snacks like crispy jalapeno popper wontons or creamy bacon ranch potato salad. The sweet and salty combo is always a hit.
Storage Instructions:
Refrigerator:
Store in an airtight container for up to 1 week. Keep them in a cool, dry place. Humidity is the enemy of royal icing; it can make it sticky. If it’s a humid day, keep them in the fridge.
Freezing:
You can freeze the un-iced cookies for up to 3 months. Thaw them at room temperature before icing. Do not freeze iced cookies; the icing will become soggy and lose its shine.
Pro Tip:
If you’re making these for a party, make the dough on Friday, bake on Saturday, and ice on Sunday morning. This gives the icing plenty of time to dry and harden before guests arrive.
Nutrition Information
I’m not a nutritionist, but here’s the breakdown if you’re tracking. This is per cookie (makes about 24).
| Nutrient | Amount |
|---|---|
| Calories | 180 |
| Protein | 2g |
| Carbs | 28g |
| Fiber | 0g |
| Sugar | 20g |
| Fat | 8g |
| Saturated Fat | 5g |
| Cholesterol | 35mg |
| Sodium | 120mg |
What’s Good:
– Decent protein from the egg yolks
– Can be made gluten-free or vegan with substitutions
– Easy to portion control (they’re small!)
What to Know:
– High in sugar and carbs
– Contains dairy and gluten
– Moderate sodium
My Take:
Look, these are sugar cookies. They’re meant to be sweet and indulgent. They’re not a health food. But they’re homemade, so you know exactly what’s in them. When I want to make them lighter, I reduce the sugar in the dough by ¼ cup and use less icing. But usually? I just eat two and enjoy them.
Final Thoughts
So that’s my go-to football sugar cookies! I’ve probably talked your ear off at this point, but when you make a recipe this often, you have a lot to say about it. These cookies have saved my game day desserts more times than I can count. They’re my answer to “what’s for dessert” when I’m tired, don’t want takeout, and still want something that looks impressive.
My kids are happy, my husband’s happy, and I’m happy because I’m not stressed about cooking. Make them yours! Try different team colors, swap in your favorite icing flavors, or even try smoking them with different wood chips. The best recipes are the ones you adapt to your family’s tastes.
If you make this, drop a comment and let me know what you think! I love hearing how recipes turn out in your kitchen. And if something doesn’t work, tell me that too—I’m here to help troubleshoot. Happy cooking! And I hope your kitchen (or grill) smells half as good as mine does right now.
Frequently Asked Questions
Q: Can I use whole eggs instead of just yolks?
A: You can, but the cookies will be cakier and less chewy. The yolks add richness and tenderness. If you must use whole eggs, reduce the amount of water in the icing by a tablespoon to compensate for the extra moisture.
Q: Why did my cookies spread too much?
A: Usually means your butter was too warm or you skipped the chilling step. Make sure your butter is softened, not melted, and chill the dough for at least 2 hours. Also, check that your baking powder is fresh.
Q: Can I make the dough ahead?
A: Absolutely! The dough will keep in the fridge for up to 3 days. You can also freeze the dough balls for up to 3 months. Thaw in the fridge overnight before rolling and cutting.
Q: How do I get the icing to dry hard?
A: Use meringue powder, not raw egg whites. It stabilizes the icing and helps it dry quickly. Also, make sure the icing is thick enough to hold its shape. If it’s too thin, it will never dry hard.
Q: Can I smoke the cookies without a pellet grill?
A: Yes! Any grill with a smoker box or wood chips will work. Set up for indirect heat and keep the temperature low, around 275°F. Add wood chips every 30 minutes to maintain the smoke flavor.
Q: What’s the best way to store iced cookies?
A: In an airtight container, layered with parchment paper between layers. Keep them in a cool, dry place. If it’s humid, store them in the fridge. They’ll last up to a week.
Q: Can I use buttercream instead of royal icing?
A: You can, but buttercream doesn’t dry hard. It will stay soft and might smudge when you stack the cookies. Royal icing is best for detailed decorating and stacking. If you prefer buttercream, use a stiff consistency and let them dry for a few hours.
Pin This Recipe!


Football Sugar Cookies: Grill-Smoked Game Day Treats
- Total Time: 45 minutes
- Yield: 24 servings 1x
Description
Chewy, buttery sugar cookies with a subtle smoky depth, designed for game day parties. These sturdy cookies hold intricate royal icing designs and can be baked in the oven or smoked on a grill for extra flavor.
Ingredients
- 1 cup (226g) unsalted butter, softened
- 1 ½ cups (300g) granulated sugar
- 2 large egg yolks
- 2 teaspoons vanilla extract
- 3 cups (375g) all-purpose flour
- 1 teaspoon baking powder
- 1 teaspoon salt
- ½ teaspoon liquid smoke (hickory or applewood)
- 4 cups (480g) confectioners’ sugar, sifted
- 3 tablespoons meringue powder
- 6–8 tablespoons water
- Gel food coloring (red, blue, white, black, yellow)
Instructions
- In a stand mixer, beat softened butter and granulated sugar on medium-high speed for 3-4 minutes until light and fluffy. Scrape down the sides.
- Reduce speed to medium. Add egg yolks one at a time, mixing until combined. Add vanilla extract and liquid smoke; mix for another minute.
- In a separate bowl, whisk together flour, baking powder, and salt. With mixer on low, gradually add dry ingredients to wet mixture. Mix until just combined; do not overmix.
- Divide dough into two discs, wrap tightly in plastic wrap, and refrigerate for at least 2 hours or overnight.
- Preheat oven to 350°F (175°C) or grill to 275°F (135°C) for indirect heat. Roll dough to ¼ inch thickness on a floured surface and cut into shapes.
- Place cutouts on parchment-lined baking sheets. Bake for 12-15 minutes until edges are lightly golden, or smoke on the grill for 12-15 minutes.
- Let cookies cool on the baking sheet for 5 minutes, then transfer to a wire rack to cool completely.
- Beat meringue powder with 6 tablespoons water until frothy. Gradually add sifted confectioners’ sugar, beating on low then high for 3-4 minutes until stiff peaks form.
- Divide icing into bowls and mix with gel food coloring. Transfer to piping bags.
- Pipe details onto cooled cookies. Let icing dry for at least 4 hours or overnight until hard.
Notes
Chilling the dough is crucial to prevent spreading. Use gel food coloring for vibrant colors without thinning the icing. Store cookies in an airtight container with a piece of bread to maintain softness. Do not freeze iced cookies as the icing will become soggy.
- Prep Time: 30 minutes
- Cook Time: 15 minutes
- Category: Dessert
- Cuisine: American
Nutrition
- Serving Size: 1 cookie
- Calories: 180
- Sugar: 20
- Sodium: 120
- Fat: 8
- Saturated Fat: 5
- Carbohydrates: 28
- Protein: 2
Keywords: football cookies, game day dessert, sugar cookies, grill smoked cookies, royal icing, party treats, chewy sugar cookies


