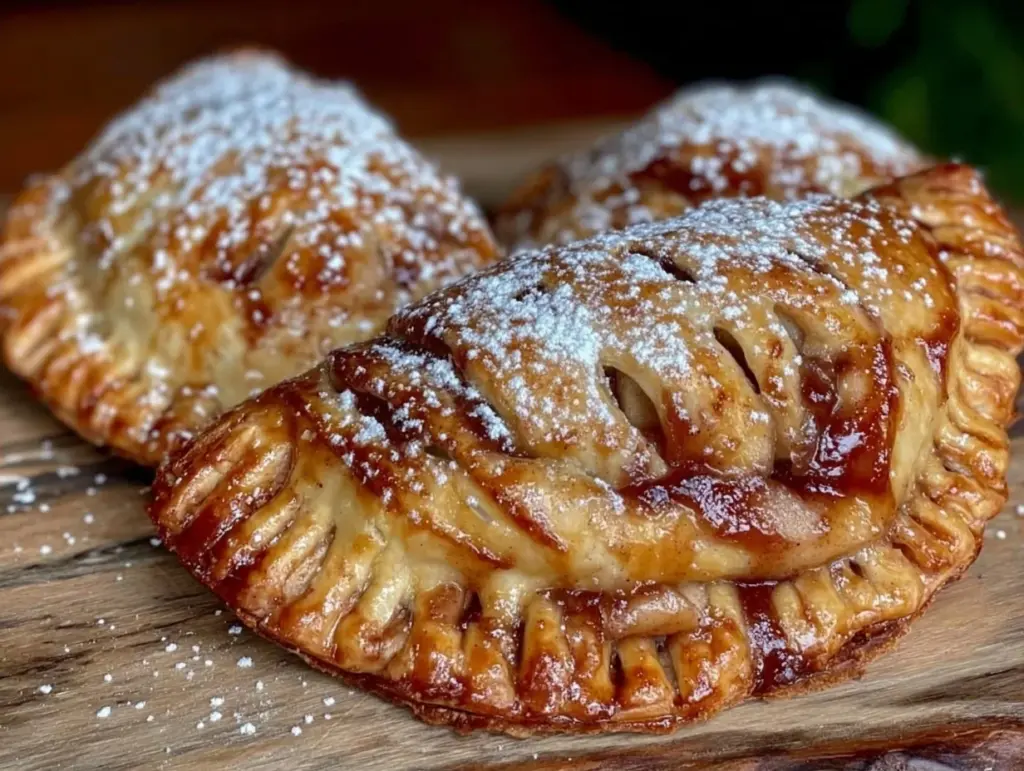
There is a specific kind of magic that happens in October when the air turns crisp and my kitchen fills with the scent of caramelizing sugar and spiced apples. I remember the first time I made these Fall Salted Caramel Apple Hand Pies. It was late October, my in-laws were visiting for the weekend, and I was stressed about what to serve for dessert. I didn’t have the energy for a towering, multi-layered cake, but I also didn’t want to serve something that felt “cheap” or store-bought. So, I improvised. I rolled out some leftover pie dough, spooned in a mixture of caramelized apples and thick, gooey salted caramel, and folded them into little golden pockets.
When they came out of the oven, glistening with that egg wash and dusted with flaky sea salt, the room went quiet for a second. Then, my father-in-law took one bite, closed his eyes, and said, “You didn’t buy these, did you?” That was the moment these hand pies became my secret weapon for impressing guests without spending all day in the kitchen. They look like they came from a high-end patisserie, but they’re actually just rustic, handheld, and incredibly easy to make.
I’ve made these pies at least a dozen times since that weekend—once for a harvest bridal shower, twice for a cozy movie night in, and several times just because they’re that good. Every time, people ask for the recipe. The combination of tender, spiced apples with the deep, buttery richness of salted caramel is just unbeatable. It’s the perfect balance of sweet and savory, warm and comforting. If you’re looking for a dessert that feels special but is actually simple to pull together, this is it. Trust me, once you try these, you’ll be making them every fall.
Why You’ll Love These Hand Pies
These aren’t just another apple pie recipe. They’re a complete experience. Here’s why I keep coming back to this one, and why your guests will be asking for seconds (and thirds):
- They’re Impressive Without the Stress — Let’s be real. A whole pie can be intimidating to serve. It’s messy, it’s heavy, and it requires a perfect slice. Hand pies? They’re handheld elegance. You can make them ahead, reheat them, and serve them on a platter. They look fancy, but they’re actually foolproof. I’ve made these while multitasking with dinner prep, and they still turn out perfect.
- The Flavor is Next Level — Plain apple pie is great, but adding salted caramel changes the game. The salt cuts through the sweetness of the caramel and highlights the tartness of the apples. It’s complex, rich, and deeply satisfying. It’s like a bite of homemade salted caramel hot chocolate but in pastry form.
- Perfect for Any Occasion — Whether it’s a formal dinner party, a casual game day gathering, or just a Tuesday night treat, these fit. They’re portable, which makes them great for potlucks. I once brought a batch to a neighbor’s house, and they were gone in ten minutes. No leftovers, no drama.
- Uses Store-Bought Dough (But You’ll Never Know) — I’m not going to lie to you. I use high-quality store-bought puff pastry or pie dough for 90% of the prep. It saves hours of work. When you fill it with that warm caramel-apple mixture, no one will ever guess you didn’t roll the dough yourself. And if they do? I won’t tell.
- They Taste Better the Next Day — Seriously. The flavors meld together overnight. The pastry stays crisp on the outside while the filling gets even more gooey. I often make these the night before a party, and they’re even better the next evening. Just reheat them gently before serving.
So basically, you get a dessert that looks artisanal, tastes incredible, and doesn’t require a culinary degree. It’s my go-to when I want to spoil my guests without losing my mind.
Ingredients You’ll Need
Here’s the best part: most of these ingredients are staples you probably already have in your pantry and fridge. I’m particular about a few things here, so let’s break it down.
For the Filling
Apples (3 large) — You need apples that hold their shape but get tender. I love a mix of Granny Smith and Honeycrisp. Granny Smith gives the tartness, Honeycrisp adds sweetness and texture. Avoid Red Delicious—they turn to mush. Peel and dice them into small, bite-sized cubes.
Unsalted Butter (2 tablespoons) — For sautéing the apples. I use European-style butter if I can find it, because it has a higher fat content and richer flavor. But regular unsalted works fine too.
Granulated Sugar (¼ cup) — Just enough to help caramelize the apples. Don’t overdo it, as the caramel sauce will add plenty of sweetness.
Brown Sugar (2 tablespoons) — Adds a molasses depth that pairs perfectly with the apples. Light or dark brown sugar both work.
Spices (1 tsp cinnamon, ¼ tsp nutmeg, pinch of salt) — This is the heart of the “fall” flavor. Freshly grated nutmeg is a game-changer, but ground nutmeg works too. Don’t skip the salt—it balances the sugar.
Apple Cider (¼ cup) — This is the secret ingredient. It adds a intense apple flavor and helps create a syrupy sauce. Look for 100% apple cider, not apple juice cocktail. It makes a huge difference.
Thickener (1 tablespoon cornstarch) — Mixed with 1 tablespoon of cold water to make a slurry. This thickens the juices so your hand pies don’t leak all over your oven. Trust me, this step is crucial.
Salted Caramel Sauce (½ cup) — You can use store-bought (I like Toffifay or a high-quality jarred sauce) or make your own. If making your own, keep it thick and gooey. Thin caramel will make the dough soggy.
For the Pastry

Pie Dough or Puff Pastry (2 sheets) — I prefer puff pastry for these because it gets incredibly flaky and layered, which feels more “special.” But traditional pie dough works too if you want a more rustic, tender crust. Thaw completely before rolling.
Egg (1 large, beaten with 1 tbsp water) — This is your egg wash. It gives the pies that golden, shiny, bakery-style finish. Don’t skip it!
Coarse Sea Salt (like Maldon) — For sprinkling on top before baking. This adds that essential salty crunch that contrasts with the sweet filling.
Vanilla Ice Cream or Whipped Cream — For serving. Warm pie + cold ice cream = perfection. I don’t judge if you eat these plain, but I highly recommend the contrast.
Equipment Needed
You don’t need fancy gadgets for this. Here’s what I actually use:
Large Skillet or Sauté Pan — I use a 10-inch stainless steel skillet. It needs to be wide enough to spread the apples in a single layer so they caramelize instead of steam.
Rolling Pin — Any standard rolling pin works. I like a wooden one, but a silicone one is fine too. Just make sure it’s clean.
Pastry Brush — For applying the egg wash. A silicone brush is easier to clean, but a natural bristle brush works too. Just dip it lightly; you don’t want to drown the dough.
Sharp Knife and Cutting Board — For dicing the apples. Uniform pieces cook evenly, so try to keep them all about the same size.
Pie Cutter or Fork — To crimp the edges. A fork is easier for beginners, but a fluted pie cutter looks more professional. I use a fork because it’s faster and I don’t care about perfection.
Baking Sheet with Parchment Paper — Line your baking sheet with parchment. This prevents sticking and makes cleanup a breeze. I’ve burned pies on bare pans before—don’t make my mistake.
Small Bowl — For the egg wash and the cornstarch slurry.
How to Make It: Step-by-Step
Alright, let’s make these! I’m walking you through exactly how I do it, including the little tricks I’ve picked up over the years.
Step 1: Prep the Apples (10 minutes)
Peel, core, and dice your apples into small cubes (about ½-inch pieces). You want them small enough to fit in the hand pie but substantial enough to have texture. In a large skillet, melt the butter over medium heat. Add the diced apples, granulated sugar, brown sugar, cinnamon, nutmeg, and salt. Cook for 5-7 minutes, stirring occasionally, until the apples start to soften and release their juices. They should be tender but not mushy.
Step 2: Thicken the Filling (5 minutes)
Stir in the apple cider and bring it to a gentle simmer. In a small bowl, mix the cornstarch with 1 tablespoon of cold water to create a slurry. Pour the slurry into the skillet while stirring constantly. The mixture will thicken quickly into a glossy, syrupy consistency. Remove from heat and stir in the salted caramel sauce. Let this mixture cool completely. If you assemble the pies while the filling is hot, the dough will get soggy and fall apart. I usually let it cool on the counter for 20 minutes, or pop it in the fridge for 10.
Step 3: Roll Out the Dough (5 minutes)
Preheat your oven to 400°F (200°C). Line a baking sheet with parchment paper. On a lightly floured surface, roll out your puff pastry or pie dough. If using puff pastry, roll it into a rectangle about 12×16 inches. If using pie dough, roll it into two circles about 8 inches in diameter. Cut the dough into squares (4×4 inches for puff pastry, or use a cookie cutter for rounds).
Step 4: Assemble the Hand Pies (10 minutes)
Place a spoonful of the cooled apple-caramel filling in the center of each dough square. Leave a ½-inch border around the edges. Brush the edges with a little water (this helps them seal). Fold the dough over the filling to create a triangle or rectangle, pressing the edges firmly with a fork to seal. Poke 2-3 small holes in the top of each pie with a fork or knife to let steam escape. This prevents them from bursting in the oven.
Step 5: Bake to Golden Perfection (15-18 minutes)
Brush the tops of the pies with the egg wash. Sprinkle generously with coarse sea salt. Bake for 15-18 minutes, or until the pastry is puffed, golden brown, and flaky. Keep an eye on them near the end—ovens vary, and you want that deep golden color, not pale.
Step 6: Cool and Serve
Let the hand pies cool on the baking sheet for at least 10 minutes. This allows the filling to set slightly so it’s not molten lava when you bite into it. Serve warm with a scoop of vanilla ice cream or a dollop of whipped cream.
Total Time: About 45 minutes (15 minutes prep, 30 minutes cook/cool)
Expert Tips & Tricks
Here’s everything I’ve learned from making these dozens of times. These tips will save you from my mistakes.
- Cool the Filling Completely — This is the #1 rule. Hot filling = soggy bottom. I’ve ruined batches by rushing this step. If you’re short on time, spread the filling on a plate and put it in the fridge for 15 minutes.
- Don’t Overfill — It’s tempting to pile on the filling, but if you overstuff them, they’ll leak. A tablespoon or two per pie is plenty. Less is more here.
- Seal Well — Press the edges firmly. If you’re using puff pastry, it can be tricky to seal. Use a little egg wash on the edges to help it stick. If you see any gaps, pinch them shut.
- Egg Wash Technique — Don’t slather the egg wash on. Just brush it lightly on the top. If it pools in the seams, it will burn and look dark. You want an even, golden sheen.
- Use Quality Caramel — If your caramel is too thin, it will make the dough soggy. If it’s too hard, it won’t ooze. Look for a sauce that is thick but pourable. Homemade caramel that has cooled slightly is perfect.
Variations & Substitutions
Once you’ve nailed the basic version, here’s how you can mix it up. I’ve tried all of these:
- Pumpkin Spice Version — Swap the apples for canned pumpkin puree (drained well) mixed with pumpkin pie spice and brown sugar. Add a drizzle of caramel on top after baking.
- Pear and Gorgonzola — For a savory-sweet twist, use sliced pears, a crumble of Gorgonzola cheese, and a touch of honey. Top with walnuts. This is great for appetizers.
- Chocolate Chip Apple — Add a handful of mini chocolate chips to the apple filling. It’s like an apple pie à la mode in hand form.
- Gluten-Free — Use gluten-free puff pastry or pie dough. The filling is naturally gluten-free, so just swap the dough. I’ve used Dufour gluten-free puff pastry, and it works great.
- Vegan — Use vegan butter in the filling, vegan puff pastry, and an egg wash made from 1 tablespoon of plant milk mixed with 1 teaspoon of maple syrup. The caramel must be vegan-certified.
Serving & Storage
How to Serve: I usually serve these warm, straight from the oven or gently reheated. They look beautiful on a white plate with a dusting of powdered sugar. Pair them with a cup of coffee or a glass of dessert wine. I also love serving them alongside a simple creamy strawberry cheesecake milkshake for a fun, indulgent dessert flight.
Refrigerator: Store leftovers in an airtight container for up to 3 days. They will lose some flakiness but still taste great.
Reheating: Reheat in a 350°F oven for 5-7 minutes to crisp up the pastry. Avoid the microwave—it makes the dough chewy and sad. If you must use the microwave, do it for 10 seconds max.
Freezing: You can freeze the unbaked hand pies on a baking sheet, then transfer to a freezer bag. Bake from frozen, adding 5 minutes to the cook time. Do not freeze baked pies—the texture suffers.
Nutrition Information
I’m not a nutritionist, but here’s the breakdown if you’re tracking. These are indulgent treats, so enjoy them in moderation!
| Per Hand Pie (approx.) | Amount |
|---|---|
| Calories | 280 |
| Fat | 14g |
| Carbs | 38g |
| Fiber | 2g |
| Sugar | 22g |
| Protein | 3g |
What’s Good: They have some fiber from the apples and a bit of protein from the dough. What to Know: They’re higher in sugar and saturated fat due to the butter, sugar, and caramel. But hey, it’s dessert. Life’s too short to worry too much about one hand pie.
Final Thoughts
So that’s my Fall Salted Caramel Apple Hand Pies! I’ve probably talked your ear off at this point, but when you make a recipe this often, you have a lot to say about it. These pies have saved me more times than I can count. They’re my answer to “what do I bring to the party” when I want to look like a pro but actually enjoy myself.
Make them yours! Try different apples, different spices, or different fillings. The best recipes are the ones you adapt to your tastes. If you make these, drop a comment and let me know how they turned out! I love hearing how recipes turn out in your kitchen. And if something doesn’t work, tell me that too—I’m here to help troubleshoot.
Happy baking! And I hope your kitchen smells half as good as mine does right now.
Frequently Asked Questions
Can I use frozen apples?
You can, but thaw them completely and drain off as much liquid as possible before cooking. Frozen apples release a lot of water, which can make the filling watery. Fresh apples are always better for this recipe.
Why did my hand pies leak in the oven?
This usually happens if the filling was too hot when you assembled them, or if you didn’t seal the edges well enough. Make sure the filling is cool, press the edges firmly, and poke steam vents in the top. Also, don’t overfill them.
Can I make these ahead of time?
Yes! Assemble them and keep them in the fridge for up to 24 hours before baking. You can also freeze them unbaked for up to 3 months. Just bake from frozen, adding a few minutes to the cook time.
What’s the best apple for this recipe?
I recommend a mix of Granny Smith (for tartness and structure) and Honeycrisp or Fuji (for sweetness). Avoid apples that turn to mush, like Red Delicious or McIntosh.
Can I use pie dough instead of puff pastry?
Absolutely. Pie dough will give you a more tender, crumbly crust, while puff pastry gives you a flaky, layered, airy texture. Both are delicious. Puff pastry is easier to work with if you’re a beginner because it’s less likely to shrink.
How do I store leftovers?
Store in an airtight container at room temperature for up to 2 days, or in the fridge for up to 3 days. Reheat in the oven to restore crispness.
Pin This Recipe!


Fall Salted Caramel Apple Hand Pies
- Total Time: 45 minutes
- Yield: 8 servings 1x
Description
Rustic, handheld pastries filled with spiced caramelized apples and gooey salted caramel, topped with flaky sea salt. These impressive yet easy-to-make treats are perfect for fall parties and gatherings.
Ingredients
- 3 large apples (Granny Smith and Honeycrisp mix), peeled and diced
- 2 tablespoons unsalted butter
- 1/4 cup granulated sugar
- 2 tablespoons brown sugar
- 1 tsp cinnamon
- 1/4 tsp nutmeg
- Pinch of salt
- 1/4 cup apple cider
- 1 tablespoon cornstarch mixed with 1 tablespoon cold water
- 1/2 cup thick salted caramel sauce
- 2 sheets pie dough or puff pastry, thawed
- 1 large egg beaten with 1 tbsp water (for egg wash)
- Coarse sea salt (like Maldon) for sprinkling
- Vanilla ice cream or whipped cream for serving
Instructions
- Preheat oven to 400°F (200°C) and line a baking sheet with parchment paper.
- In a large skillet over medium heat, melt butter. Add diced apples, granulated sugar, brown sugar, cinnamon, nutmeg, and salt. Cook for 5-7 minutes until apples soften and release juices.
- Stir in apple cider and bring to a gentle simmer. Add the cornstarch slurry and stir constantly until the mixture thickens into a glossy syrup.
- Remove from heat and stir in the salted caramel sauce. Let the filling cool completely (about 20 minutes on counter or 10 in fridge).
- Roll out the dough on a floured surface. Cut into 4×4 inch squares (for puff pastry) or 8-inch circles (for pie dough).
- Place a spoonful of cooled filling in the center of each dough piece, leaving a 1/2-inch border.
- Brush edges with water, fold dough over filling to seal, and crimp edges with a fork. Poke 2-3 steam vents in the top.
- Brush tops with egg wash and sprinkle generously with coarse sea salt.
- Bake for 15-18 minutes until golden brown and flaky.
- Cool on the baking sheet for at least 10 minutes before serving warm with ice cream or whipped cream.
Notes
Ensure the filling is completely cool before assembling to prevent soggy dough. Do not overfill the pies to avoid leaking. For best results, use high-quality salted caramel that is thick but pourable. These taste better the next day as flavors meld.
- Prep Time: 15 minutes
- Cook Time: 30 minutes
- Category: Dessert
- Cuisine: American
Nutrition
- Serving Size: 1 hand pie
- Calories: 280
- Sugar: 22
- Fat: 14
- Carbohydrates: 38
- Fiber: 2
- Protein: 3
Keywords: fall dessert, apple hand pies, salted caramel, party treats, easy dessert, puff pastry recipes, apple pie alternative


